Create a New Calendar
You must be registered and logged in as a supplier to create and upload new calendars
Click here to register as a supplier on winedering.com or, if you are already registered as a supplier, click here to login
Manage single calendar
When uploading a new experience or modifying an existing one, a calendar has always to be completed in order to go live. In this section we'll see how to create ONE SINGLE CALENDAR.
To create a single calendar, open your dashboard and select experience you want to work on.
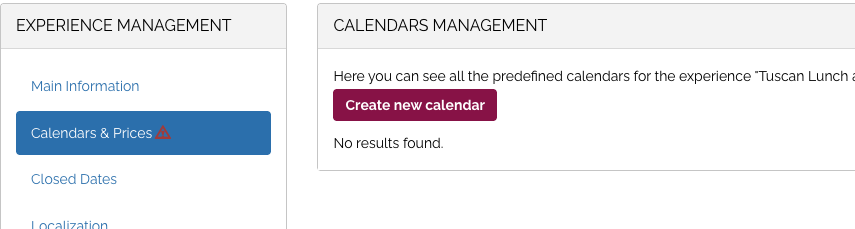
Once the experience is open, select CALENDARS. The calendars button is available on the left side of the dashboard of the experience. If NO calendars are active, you'll see a red sign (like in the example below) showing you that you need to add at least one calendar.
Under Calendars Managament you'll find "create new calendar"
Once you open "Create new calendar" you'll find all the instructions to complete the calendar, with the following elements to fill
Calendar name
Calendar name is mandatory an useful as it explains what calendar you're referring to (ex. 2025)

Start date of availability
This field indicates the first day your customers will be able to book the experience under this specific calendar. If you're unsure, you can simply enter today’s date or a date in the near future. It’s also useful if your experience will start later (e.g. in 2 weeks); in that case, just select the appropriate future start date.
To set the date, click on the empty field and choose the desired day from the calendar pop-up.
End date of availability (optional)
You’ll see two options:
-
Yes (You will need to select an end date)Tick this only if the experience will stop running on a specific date within the month range selected.For example, if your activity runs from June 1 to July 15 only.
-
No (It will be the last day of the last month selected below)Choose this if your activity is available through the full months you selected .The system will automatically close availability at the end of the last month you’ve defined.
💡 In most cases, you can leave the end date option set to “No”.
Do Not Repeat Calendar in the Future
-
This box controls whether the calendar automatically repeats after the defined period ends.
-
Recommended: leave this box unchecked so that the calendar continues to apply in future years unless you manually stop it.
-
If you check this box, the calendar will only be valid for the time period selected, and will not repeat in the following years.
Next, tick the months and days of the week when your experience is available.
Add timeslots
You’ll now see two options to define the times at which the experience can be booked:
Option A – Add a Time Slot
Use this if your experience runs at specific, non-continuous hours, such as 10:00 and 15:00.
-
Click “Add a time slot”
-
Click on the arrow in the empty field to open the hour and minute selector
-
Choose the desired time
-
To add more, repeat the process by clicking “Add a time slot” again
Option B – Add a Range of Time Slots
Use this if your experience is continuously available over a range of hours (e.g. from 10:00 to 17:00).
-
Click “Add a range of time slots”
-
Fill in the start time and end time (format: hours:minutes)
-
Choose the interval between slots:
-
0 = every hour
-
:30= every 30 minutes -
:15= every 15 minutes
-
-
Click “Add time slots” to generate and save all the slots — they will appear automatically.
Manage seasonal calendars
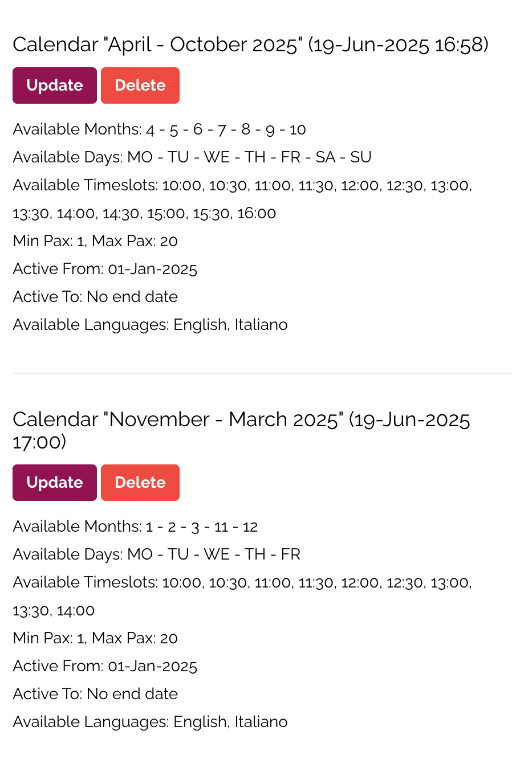
This section explains how to manage at least two different calendars when working with seasonal availability or seasonal pricing.
If your experience changes depending on the season – whether in price, time slots, capacity, or availability – you must create separate calendars for each season (e.g. high season and low season).
For example, a winery might offer different time slots in summer compared to winter, increase prices during peak months, or allow larger groups for tastings in summer (e.g. outdoor spaces for 50 guests) and smaller groups in winter (e.g. indoor spaces for 20 guests).
In situations like these, a single calendar cannot reflect all variations. To manage these seasonal differences correctly, suppliers must create two or more calendars – one for each defined season.
To do this, simply click again on “Create new calendar” in the Calendars and Prices section of your experience, and fill in the appropriate dates, time slots, pricing, and capacity for that season.
Assign each calendar a name that reflects the period to recognize them better, e.g. “High Season 2025” and “Low Season 2025”.
Manage calendars by weekdays and weekends/holidays
This section explains cases when availability is set by specific days of the week.
For some experience it may be needed to offer different time slots depending on the day of the week (e.g. Monday–Friday vs. Saturday–Sunday) and the time of year (e.g. low vs. high season).
In these cases, we recommend creating separate calendars that reflect both dimensions. For example:
-
"Presummer Weekdays": June–July, Mon–Fri, 10:00-16:00 slots every hour
-
"Presummer Weekends": June–July, Sat, 10:00 and 14:00 slots
-
"Summer Weekdays": August–Sept, Mon–Fri, 10:00-17:00 slots every half an hour
-
"Summer Weekends": August–Sept, Sat–Sun, 10:00, 14:00, 16:00 slots
-
"Fall/Winter Weekdays": October–March, Mon–Fri, 10:00-15:00 slots every hour
-
"Fall/Winter Weekends": October–March, Sat–Sun, 10:00 and 14:00 slots
Manage calendars per timeslots
This section explains cases when availability is set on the same days and months, but with different time slots.
If your experience runs during the same months but at different times depending on the day, you’ll need to create separate calendars.
For example: if your picnic runs daily from April to September, but starts at 6:00 PM on weekdays and 7:00 PM on Saturdays, this variation cannot be managed in one calendar. You'll need to add one calendar for Sunday–Friday and another for Saturday, each with its correct time slot.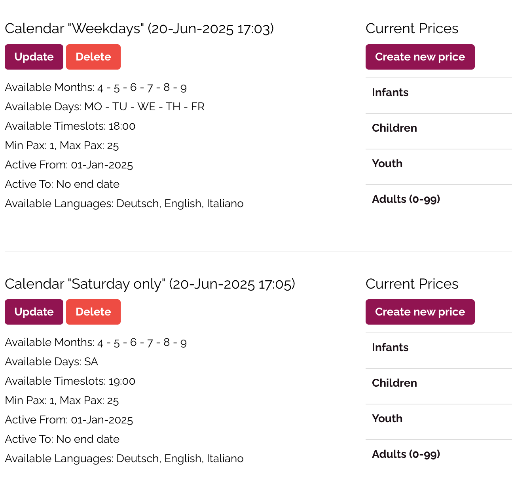
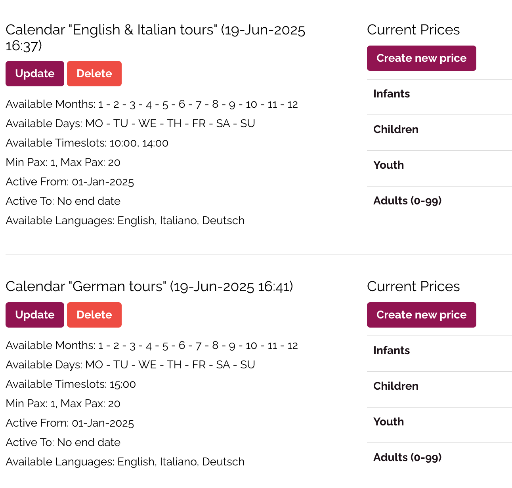
Manage calendars per languages
This section explains cases when calendar availability varies by language.
In some cases, the availability of an experience varies depending on the language in which it is offered. This is common for guided tours or tastings where different language options are offered at specific times or days of the week.
For example, an experience may be available in Italian every day, but in French only from Monday to Friday, or it may run at 10:00 AM and 2:00 PM in English and Italian, and at 3:00 PM in German.
In these situations, it is essential to create one calendar for each language/timeslot combination, to avoid confusion and ensure customers only see availability in the language they select. Each calendar should clearly specify the language(s), time, and applicable availability. This ensures that the customer is booking an experience in a language they understand.