You must be registered and logged in as a supplier to create and upload new calendars
Click here to register as a supplier on winedering.com or, if you are already registered as a supplier, click here to login
Create an Adult Price
Before setting any prices, you must first create a calendar (here is the guide on how to do that). Pricing is always tied to a specific calendar, so this step must be completed first.
Once the calendar is created, the pricing window will appear:
-
Start by creating the adult price — this is mandatory to publish your calendar.
-
Then, if applicable, tick the boxes to add other categories such as "Children" or "Youth".
-
For each category (except adults), choose whether participants are free or paid, and enter the appropriate price.
-
Choose whether this is a simple price or a tier price (the difference is explained in section 4 of this guide).
-
Click Save to confirm. You can always review or update prices later using the pencil icon next to each category.
Note: If you’re creating multiple calendars (e.g., for different dates or time slots), make sure to assign prices to each calendar individually.
Infants, Children, and Youth Price Categories
If children are welcome to accompany their parents , even if you don’t offer specific pricing, meals, or activities for them, make sure to tick the “Children Allowed” box in the pricing settings.
⚠️ If this box is not selected, families may assume children aren’t allowed and skip your offer — even if you’d be happy to welcome them.
What Do the Different Price Categories Mean?
-
An infant typically refers to a child aged 0 to 3 or 4 years old. This may vary slightly depending on the experience, but generally includes very young children who are not expected to participate and are usually free of charge.
-
If your pricing is the same for all minors (e.g., ages 3 to 17), you can group them into a single category , ideally labeled "Children" .There’s no need to create multiple categories if the price doesn’t vary by age.
-
However, if you offer different prices based on age — for example:
-
Children (3–11)
-
Youth (12–17)Then you should create separate categories for each group and set prices accordingly.
-
Simple or Tier Prices
What's the difference?
-
A simple price applies a flat rate regardless of how many people are booking.
-
A tier price allows you to set different prices based on group size (e.g. €50 per person for 1–4 people, €40 per person for 5+ people). Use tier pricing when you want to incentivize larger groups or adjust costs based on the number of participants.
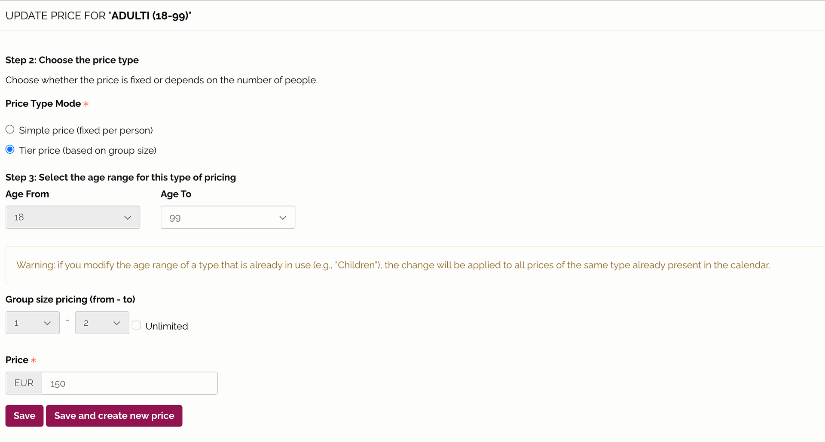
How to Create Tier Prices
-
First, create a simple adult price , selecting "Tier price" category .
-
Once saved, go back to the Calendars & Prices section and click the pencil icon next to the price you just added.
-
In the window that opens, switch to “Tier price” (see the screenshot below for reference).
-
Under Group Size Pricing, untick the "Unlimited" box, then set the specific group size range and enter the corresponding price per person for this range.
-
Click Save. To add more tiers, click Create New Price and repeat the process for each tier.
Example 1: Setting Tier Prices Based on Group Size
If you want to set different prices for group sizes ranging from 2 to 8 people, with the price decreasing as the group size increases:
-
Start by editing the price and unticking the Unlimited box. Set the first range to 1 to 2 people. If your minimum is 1 person, leave the range as 1 to 1.
-
Enter the price per person and click Save.
-
Then click Create New Price and repeat the process for each group size: 3–3, 4–4, and so on up to 8–8.
Example 2: Two-Tier Pricing for Smaller and Larger Groups
If you want to set just two pricing tiers, for example, one price for 2–4 people and a lower price for 5–8 people, you can do the following:
-
Create the first tier for 1–4 people.
-
Click Create New Price, set the range starting from 5, and leave the Unlimited box ticked.
This means the price will apply to all group sizes from 5 up to the maximum number of participants set in your calendar. -
**If the Tier Prices window doesn't appear in the price type model, it means that some required prices are still missing (such as prices for children or other categories). Please add the requested prices, click Save , and try again.
How to add and price Options
What are Options and When to Use Them
-
Classic tasting – 3 wines
-
Premium tasting – 5 wines
In these cases, it's best to create just one experience and add the variations as options.
However, if the experience includes additional components that significantly change its nature — such as food pairings or lunch — it’s better to create a separate experience instead of using options.
Examples when you should create a different experience instead of an option:
-
Classic tasting – 3 wines + cold cuts platter
-
Wine tasting with light lunch (starter, 3 wines, snacks)
How to Add and Price a New Option
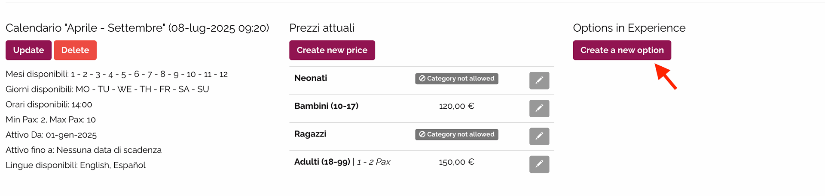
To add a new option, go to the Calendar & Prices section and click on Create a New Option.
You’ll see some helpful recommendations for creating options — please read them carefully to ensure you’re setting them up correctly.
-
Enter a name for the option and briefly describe what’s included.
-
Click Save. The new option will then appear below the “Create a New Option” button.
-
Now, assign a price to the option — this step is essential.
Important: If a price is missing for any option, that option will not be bookable.
Do not add prices to the name or description of the option label. Add it later in the appropriate field!
To set the price:
-
Click on Create New Price.
-
In the pricing window, switch from Base Tariffs to the option you just created (see screenshot for reference).
-
Set the appropriate price and click Save.

Repeat this for every option you add to ensure they’re all visible and bookable.
**If the options you added don’t appear in the pricing window, it means that some required prices are still missing (such as prices for children or other categories). Please add the requested prices, click Save, and try again. The options should then be visible and available for pricing.